BLOG
If you're as obsessed with content management as I am, then you've probably heard of Magnolia CMS, the crème de la crème of flexible and powerful CMS platforms.
But let me tell you, there's one feature that truly spices up Magnolia it is: the Nodes and Properties API.
Now get ready to take a deep dive into it and let go explore its functionalities so you make the most of them in your projects.
The Nitty-Gritty of Nodes and Properties
Alright, first let's break it down.
In Magnolia CMS, content isn’t just floating around aimlessly it’s organized in a neat, hierarchical structure made up of nodes and properties.
Think of it like a family tree, but way cooler.
Nodes can have their own child nodes and properties that hold all the juicy details.
It's a brilliant system that keeps everything tidy and easily accessible.
- Nodes: These are the fundamental building blocks in Magnolia’s content repository.
Each node can represent a page, a component, or any other content item. - Properties: These are key-value pairs associated with a node.
Properties store the actual data, such as titles, descriptions, dates, or any other content attributes.
Why Play with the API from the Frontend?
So, why should you play with nodes and properties from the frontend? Simple!
It supercharges user experience with real-time content updates, no pesky page reloads needed.
Perfect for single-page applications (SPAs) or any scenario where instant feedback and interactivity are the name of the game.
Getting Frontend Access Ready
Ready to start tinkering with the Nodes and Properties API from the frontend?
First things first, you need to make sure your Magnolia instance allows API access via HTTP.
This usually means configuring Magnolia to securely expose its REST endpoints.
Performing CRUD Operations from the Frontend
With your setup ready to roll, it's time to dive into some CRUD action on nodes and properties using standard HTTP methods (GET, POST, PUT, DELETE).
Below are examples using JavaScript and the Fetch API, because who doesn’t love a little code in their life?
Nodes API - Simple Usage
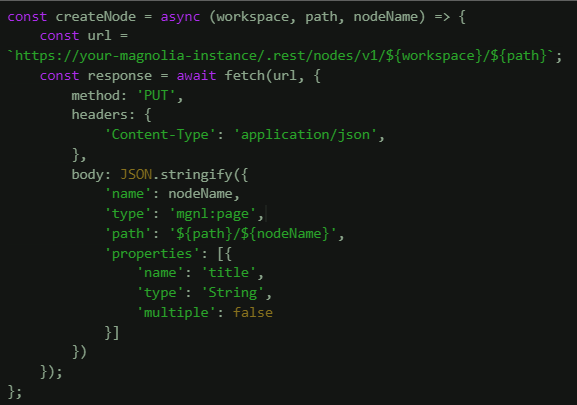
Creating Nodes
Whipping up a new node?
Easy peasy.
To create a new node (only one node can be added per request, no nested nodes are allowed), send a PUT request with the node's properties in the request body, formatted as JSON (default) or XML. Additionally, specify the workspace and the node's path as path parameters in the endpoint URL.
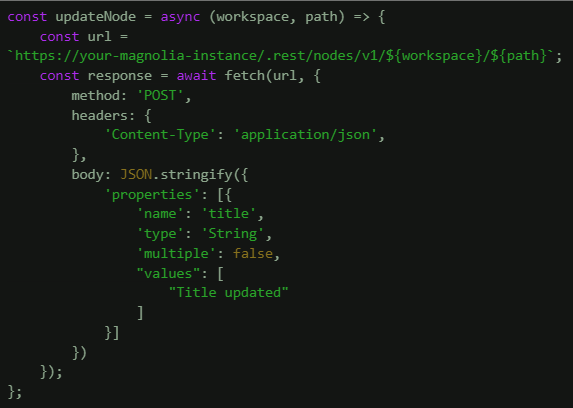
Updating Nodes
Time for a makeover!
The node can be updated using the POST method.
Send the properties to be modified in the request body, formatted similarly to the creation process.
Properties not included in the request body will remain unchanged.
The workspace and node path should be specified as path parameters in the endpoint URL.
.webp)
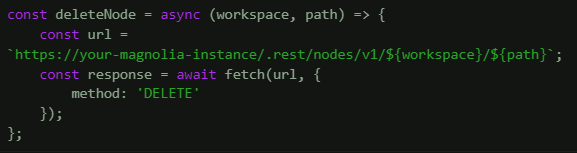
Deleting Nodes
Time to bid farewell to some nodes!
To delete a node, use the DELETE method and make sure to include the workspace and the node's path as path parameters in the URL.
It's important to include the path, if you leave it out, everything in the workspace will be deleted, which is something we definitely want to avoid.
.webp)
Properties API - Simple Usage
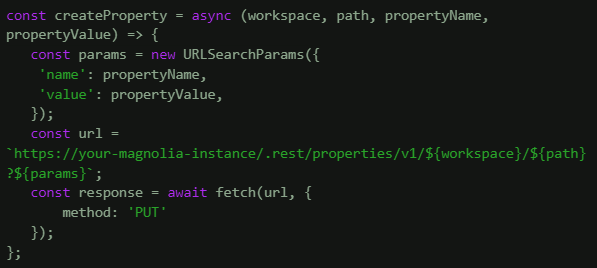
Creating Properties
Time to sprinkle some magic into your nodes with new properties!
To create a new property, send a PUT request with the workspace and the node's path as path parameters.
Include two query parameters: 'name' for the property's name and 'value' for the property's value.
.webp)
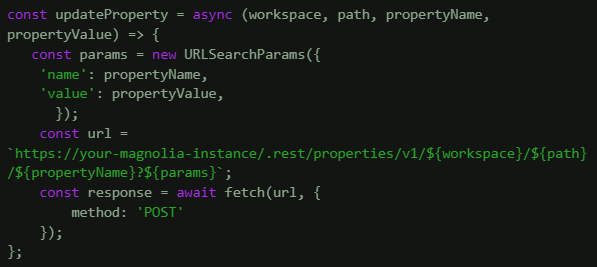
Updating Properties
Time for a property refresh!
To update a property, send a POST request with the workspace and the node's path as path parameters, and include the property's name in the path.
Add two query parameters: 'name' for the property's name and 'value' for the new value of the property.
.webp)
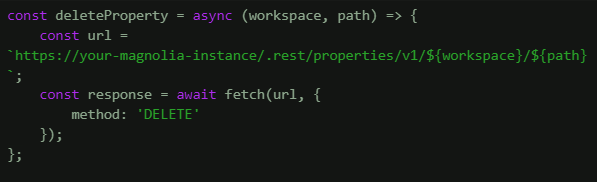
Deleting Properties
Time to trim the excess!
To delete a property, use the DELETE method and include the workspace and the property's path as path parameters.
Even though it might seem optional, the path must be included, otherwise, you'll get a 404 error indicating that the property was not found.
.webp)
Best Practices
- Secure API Access or fortify your API fortress: Ensure that only authorized users can access the API endpoints by implementing proper authentication and authorization.
- Error Handling or smooth sailing through errors: Implement robust error handling to provide meaningful feedback to users and manage exceptions gracefully.
TIP: The Nodes and Properties API is best used as a content management API.
For content delivery is recommended using Magnolia’s Delivery API.
In a Nutshell:
Leveraging the Nodes and Properties API from the frontend in Magnolia CMS can significantly enhance the interactivity and user experience of your web applications. With the right setup and security measures, this approach offers powerful possibilities for managing content directly from the client side.